


Easy Steam Push for Unity (Auto Build & Deploy)
Editor tool for building players and pushing them to Steam in one click.
Overview
Easy Steam Push for Unity removes the manual build and SteamPipe upload routine from the Unity Editor. One button on the main toolbar builds a player for every depot, writes the SteamPipe build scripts, signs in through SteamCMD and uploads, while the editor stays usable. Use it for daily iterations on a beta branch and for release builds alike.
It is the Unity sibling of Easy Steam Push for Unreal Engine: same presets, same toolbar menu, and the same SteamCMD folder and saved sign-in on your machine.
Detailed Setup and Launch Guide
Follow these steps to configure the plugin and start pushing builds to Steam directly from the Unity Editor.
Step 1: Package Installation
Get the package on the Asset Store, then open Window → Package Manager → My Assets, select EasySteamPush, press Download and Import. Everything goes into Assets/Tessermind/EasySteamPush (editor scripts only) and no other package is needed.
Unity 6.3 adds new main toolbar elements hidden. Right-click an empty area of the toolbar and enable EasySteamPush/Push and EasySteamPush/Menu. The console reminds you once after installation, and Tools → EasySteamPush → Show Toolbar Buttons shows the instructions again. Every command is also under Tools → EasySteamPush.
Step 2: SteamCMD and Steam Account
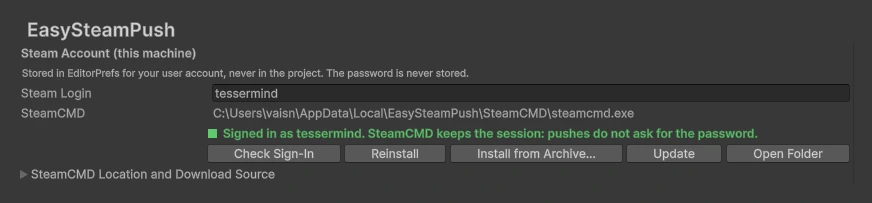
Open Edit → Project Settings → EasySteamPush. SteamCMD is required to talk to Steamworks; it is not shipped in the package.
Option A: Automatic (Recommended)
Do nothing, or press Install SteamCMD. The plugin downloads Valve's official archive from Valve's CDN, extracts it into a per-user folder outside the project and lets SteamCMD update itself.
Option B: Manual Installation
Behind a firewall or offline:
- Visit the Official SteamCMD Wiki.
- Download
steamcmd.zip(Windows),steamcmd_osx.tar.gz(macOS) orsteamcmd_linux.tar.gz(Linux). - Press Install from Archive... and select the file.
- Steam Login: your Steamworks account name. It is kept in EditorPrefs for your user, never in the project.
- No password is stored. It is asked once, handed to SteamCMD over standard input and forgotten; SteamCMD keeps its own saved sign-in.
- Status line: green Signed in as <login> when SteamCMD keeps a session, amber Not signed in otherwise. If you already signed in with Easy Steam Push for Unreal on this machine, the session is shared and the status is green right away.
Step 3: Presets (Upload Targets)
A preset is one place a build goes: the main game, a demo, a playtest. Each keeps its own App ID, depots, scenes and branch, so nothing is retyped before a push.
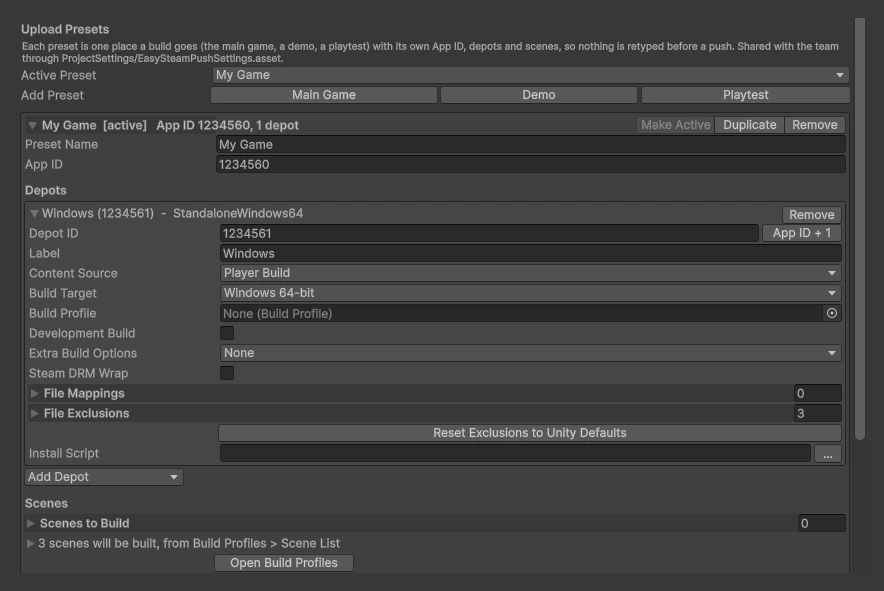
- Quick Setup: with no preset yet, choose Main Game / Demo / Playtest, enter the App ID and the Windows Depot ID (App ID + 1 fills the usual value) and press Create Preset.
- Add Preset: Main Game / Demo / Playtest adds a copy of the active preset without its App ID and Depot IDs.
- Make Active: the preset the toolbar button pushes. The same list is in the Presets dropdown.
- Scenes to Build: the Unity counterpart of Levels to Cook. Empty uses the enabled scenes of Build Profiles → Scene List; a demo can list just two scenes.
- Build Description: shown in the Steamworks build history. Tokens:
{product}{version}{target}{appid}{branch}{date}{datetime}{unity}{commit}. - Set Live Branch: a beta branch that already exists in Steamworks (App Admin → Builds). Leave empty for the default branch: Steam only sets it live by hand.
- Preview Build (dry run): SteamCMD signs in and checks everything, nothing is published.
- Output Folder: where players are built,
Builds/EasySteamPush/{target}by default. Clean Before Build removes stale files first.
Settings live in ProjectSettings/EasySteamPushSettings.asset and are shared with the team through version control. Nothing personal goes there.
Step 4: Depots and Player Builds
Add one depot per platform with Add Depot. The Depot ID comes from Steamworks (App Admin → SteamPipe → Depots).
- Content Source:
Player Buildbuilds a player withBuildPipeline;Existing Folderuploads a folder as it is (soundtrack, DLC, a build made elsewhere). - Build Target: Windows 64-bit, macOS, Linux 64-bit, Windows 32-bit. Install the platform modules in Unity Hub.
- Build Profile: optional Unity Build Profile; its scenes, scripting defines and platform settings are used.
- Development Build, Extra Build Options: passed to
BuildPipeline.BuildPlayer. - Steam DRM Wrap: optional, Windows release players only. If Steam's server-side wrap fails, the build is uploaded without DRM, with a warning.
- File Mappings / File Exclusions / Install Script: SteamPipe options. Exclusions skip
*.pdband Unity's_BurstDebugInformation_DoNotShipand_BackUpThisFolder_ButDontShipItInABuildfolders by default. - Languages: nothing to select. A Unity player carries every language of the game; supported languages are set on the store page in Steamworks.
Step 5: Sign In Once
Press Sign In to Steam. It runs a SteamCMD login without building anything, so a wrong password or a Steam Guard problem shows up in seconds. Steam may ask for the password, an email code, a Mobile Authenticator code, or an approval in the Steam Mobile App; the window says which one and the editor beeps. Afterwards the button becomes Check Sign-In and later pushes do not ask again until Steam expires the session.
Step 6: Push

Click Push: <preset> on the toolbar. The plugin checks the settings, installs SteamCMD if needed, builds one player per depot, writes app_build and depot_build scripts into Library/EasySteamPush/Scripts, signs in, uploads and, when a branch is set, sets the build live.
Player builds block the editor while they run, as every Unity build does. Signing in and uploading run in the background, and script reloads are held until the push ends.
Step 7: Watching the Progress
The EasySteamPush window is not modal; closing it does not stop the push.
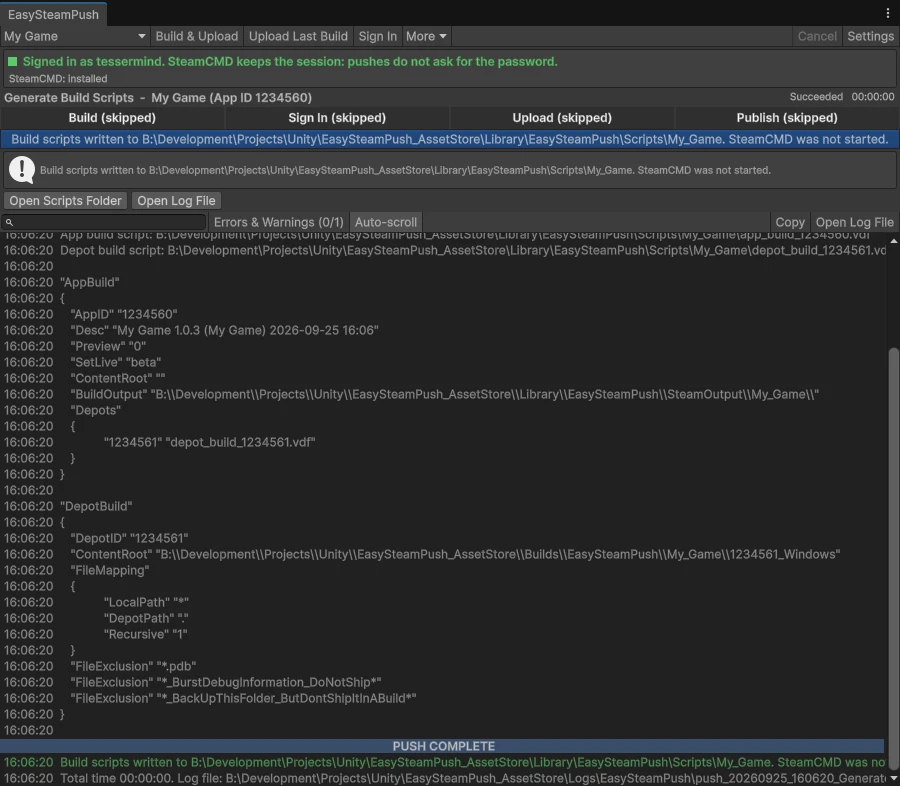
- Step strip:
Build → Sign In → Upload → Publish. Green when done, blue while running, red on failure, dark when skipped. - Steam prompts: password and Steam Guard fields appear in place when Steam asks.
- Log: timestamped and colour-coded, with search, an errors-and-warnings filter and copy; it ends with a
PUSH COMPLETE/PUSH FAILEDbanner. Every push is also saved toLogs/EasySteamPush. - Result: BuildID, Open Steamworks Builds, Retry Upload, Open Build Folder, Open Scripts Folder, and a list of recent pushes.
Uploading an Existing Build
If the build succeeded but the upload did not, the players on disk are still valid: use Retry Upload in the window, or Upload Existing Build from the Presets dropdown later. The plugin asks first if the build belongs to another App ID or changed on disk.
The Presets Menu
- Package and Push: <preset> — builds and uploads that preset, and makes it the active one.
- Upload Existing Build: <preset> — uploads that preset's last build without rebuilding.
- More: Build Only, Generate Build Scripts (dry run, SteamCMD is not started), Open Build Folder.
- Sign In to Steam, SteamCMD install / update, and Plugin Settings…
Build Servers
The same pipeline runs in batch mode:
Unity -batchmode -quit -projectPath <project>
      -executeMethod Tessermind.EasySteamPush.Editor.EasySteamPushCommandLine.Run
-espMode BuildAndUpload -espTarget "My Game" [-espTimeoutMinutes 240] -logFile --espMode: BuildAndUpload, UploadOnly, BuildOnly, GenerateScripts, SignIn, InstallSteamCmd, UpdateSteamCmd. Exit code 0 on success, 1 on failure, 2 for bad arguments. Nobody can answer Steam Guard in batch mode: sign in once from the editor on that machine, under the same OS user.
Frequently Asked Questions
The plugin calls Unity's standard BuildPipeline.BuildPlayer. Try File → Build Profiles → Build for the same platform. If it fails there too, the issue is in the project, not in the plugin. The push log in Logs/EasySteamPush contains Unity's build report.
Unity 6.3 adds custom toolbar elements hidden. Right-click an empty area of the main toolbar and enable EasySteamPush/Push and EasySteamPush/Menu. Every command is also under Tools → EasySteamPush.
The window reports what Steam chose: an email code, a Mobile Authenticator code, or an approval in the app. If it waits for the mobile app and nothing appears, close and reopen the Steam app on your phone; this is a known behaviour of SteamCMD.
No. Use Retry Upload in the window, or Upload Existing Build from the Presets dropdown. Only the upload is repeated; the players on disk are reused.
No. The plugin downloads Valve's official archive on the first push, or when you press Install SteamCMD. SteamCMD is never shipped in the package.
The password is never stored, neither in the project nor in EditorPrefs. It is asked once, passed to SteamCMD over standard input (never on the command line, never in a log), and SteamCMD keeps its own saved sign-in afterwards. Only the login name is kept, in EditorPrefs for your user.
A branch (Steam also calls it a beta) is a named channel of your app that players can switch to — demo, playtest, an internal QA build. Set Live Branch tells the plugin which one to release the uploaded build to.
Branches are not created by the upload. Create them in Steamworks under App Admin → Builds → Betas. With a name that does not exist there, Steam accepts the whole upload and only then refuses with Failed to commit build; the plugin warns you before that when a preset never published to that branch. The name is case-sensitive and cannot contain spaces. default and public are refused: leave the field empty and release the build yourself in Steamworks.
No. Steam wraps large executables on its servers and often times out; the plugin then uploads the build without DRM, with a warning. Steam DRM is optional and is not real copy protection.
No. SteamCMD and its session live in a per-user folder outside the project (%LOCALAPPDATA%\EasySteamPush\SteamCMD on Windows), shared with Easy Steam Push for Unreal.
ProjectSettings/EasySteamPushSettings.asset (commit it), players in Builds/EasySteamPush (add Builds/ to your ignore list), scripts and build records in Library/EasySteamPush, push logs in Logs/EasySteamPush. The push log never contains your password — attach it when you ask for support.